Testing desktop apps
Desktop app testing in Cress uses the Flawright runtime driver together with the same source-controlled flow model and Studio-guided authoring flow used elsewhere in the platform.
Recommended approach
Use this stack for Windows desktop applications:
- the built-in Flawright runtime driver
- Studio for recording and source refinement
- deterministic launch or attach steps
- Flawright selector-first locator design
This is a strong fit for:
- internal line-of-business desktop apps
- back-office Windows clients
- installer or launcher smoke coverage
- regulated workflows where screenshots and evidence matter
- modernization programs where UI contracts need to be stabilized over time
Tooling
| Layer | Recommendation |
|---|---|
| Runtime driver | flawright |
| Authoring surfaces | Cress.Studio.Web, Source view, Results panel |
| Sample project | specs\calc-smoke |
| Diagnostics | validate, doctor, discover, run --dry-run |
| Evidence | screenshots, run artifacts, reports |
Getting started
1. Create a project
dotnet run --project src\Cress.Cli\Cress.Cli.csproj -- init demos\desktop-client
2. Enable the Flawright driver
drivers:
  flawright:
    enabled: true
  playwright:
    enabled: false
  http:
    enabled: false
3. Configure the desktop profile
profile: local
timeouts:
  driver: 15000
evidence:
  mode: full
  screenshots: true
flawright:
  applicationPath: C:\Apps\ContosoBackOffice\ContosoBackOffice.exe
  windowTitle: Contoso Back Office
  launchTimeoutMs: 15000
4. Start the authoring workflow
- open the project in
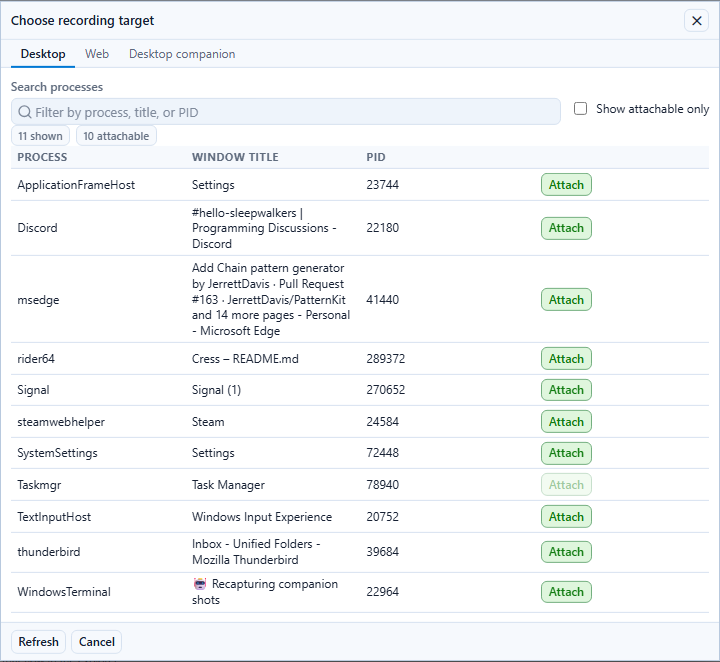
Cress.Studio.Web - choose the desktop target in the recorder
- capture the first pass of the interaction
- refine the generated source into stable Flawright selectors
- run the flow and inspect screenshots
Locator strategy
Prefer Flawright selectors in this order:
#AutomationIdname:Visible Namerole:Buttonlabel:Field Label
Examples:
selector: "#CalculatorResults"
selector: "name:Continue"
selector: "role:Button"
Realistic examples
Example 1: attach to a running app and verify a calculation
The repo’s specs\calc-smoke sample shows the attach-driven pattern:
when:
  - step: ui.attach
    with:
      processName: ApplicationFrameHost
  - step: ui.invoke
    with:
      selector: "#num2Button"
  - step: ui.invoke
    with:
      selector: "#plusButton"
  - step: ui.invoke
    with:
      selector: "#equalButton"
Example 2: launch a business client and confirm a greeting flow
version: 1
id: desktop.customer-intake
name: Desktop client shows greeting after intake
capability: customer-intake
tags:
  - desktop
  - smoke

when:
  - step: ui.launch
    with:
      application: C:\Apps\ContosoBackOffice\ContosoBackOffice.exe
      windowTitle: Contoso Back Office
  - step: ui.fill
    with:
      selector: "#NameInput"
      value: Grace Hopper
  - step: ui.invoke
    with:
      selector: "name:Continue"
then:
  - expect: ui.assert-text
    with:
      selector: "#GreetingLabel"
      text: Hello Grace Hopper
Step-by-step: test Windows Calculator
Calculator is the fastest way to prove out a desktop automation path because it is already installed on most Windows machines and the repository includes a matching sample in specs\calc-smoke.
Goal
Attach to Calculator, enter 2 + 2, and assert that the displayed result is 4.
1. Start Calculator
Open Calculator manually from the Start menu so you can use the attach pattern first.
2. Use the sample project
Start from the repo sample:
dotnet run --project src\Cress.Cli\Cress.Cli.csproj -- validate specs\calc-smoke
3. Open the sample in Studio
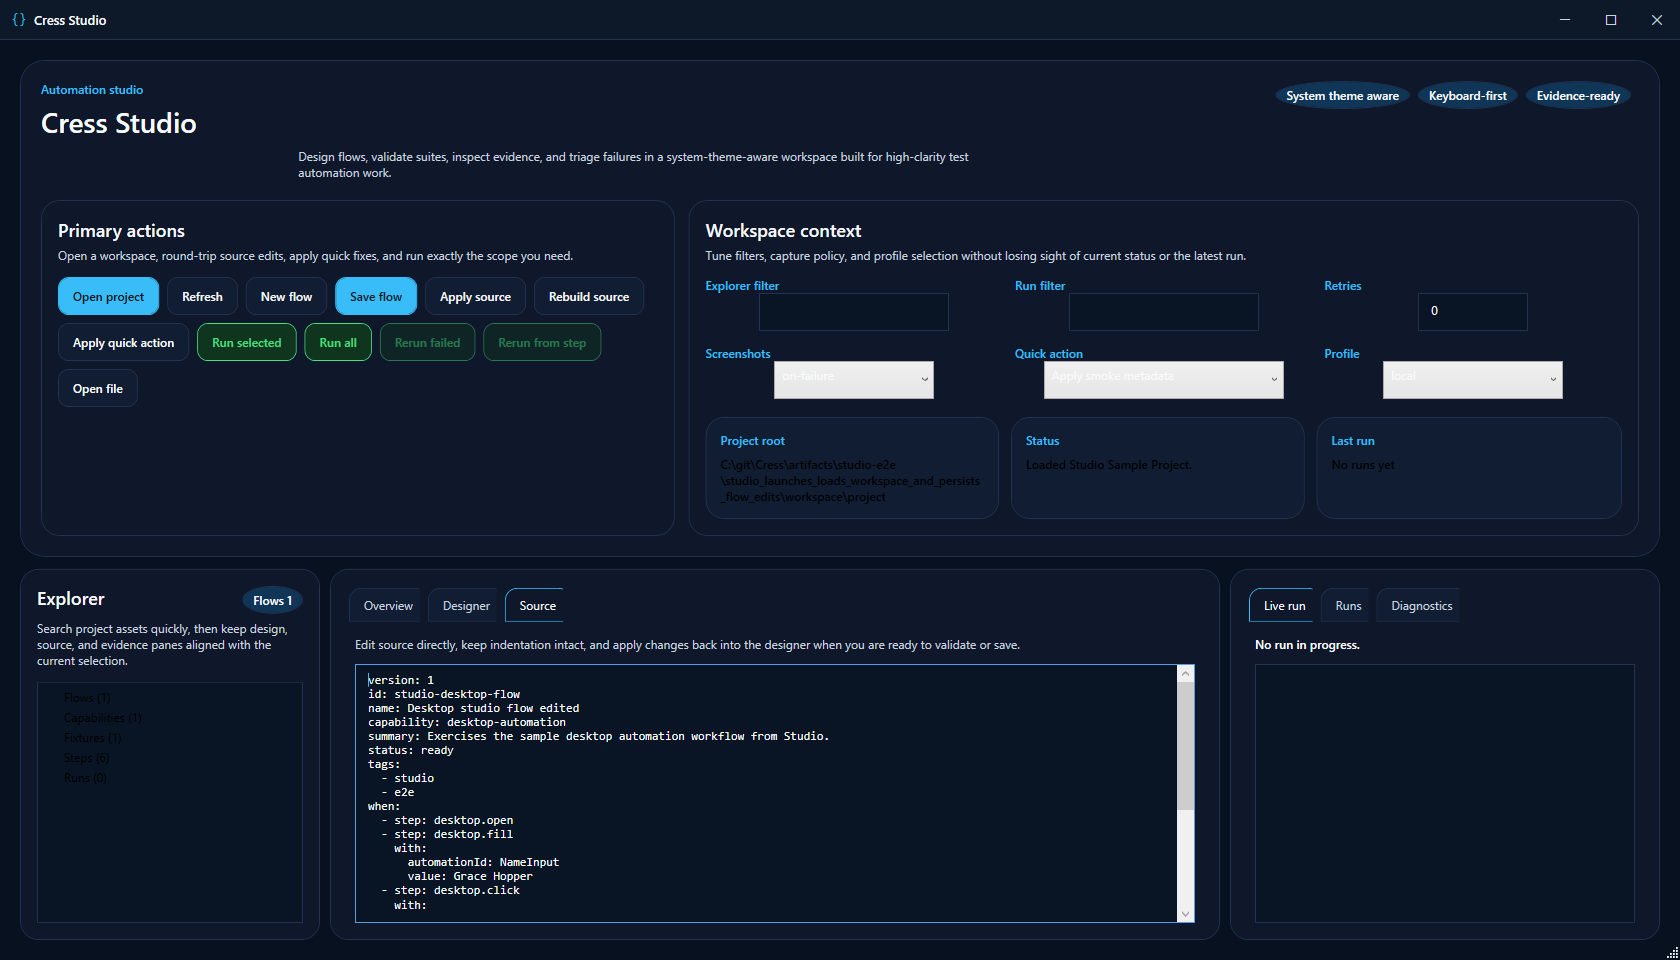
- launch Studio
- open
specs\calc-smoke - choose the desktop recording target
- confirm Calculator is the active target window
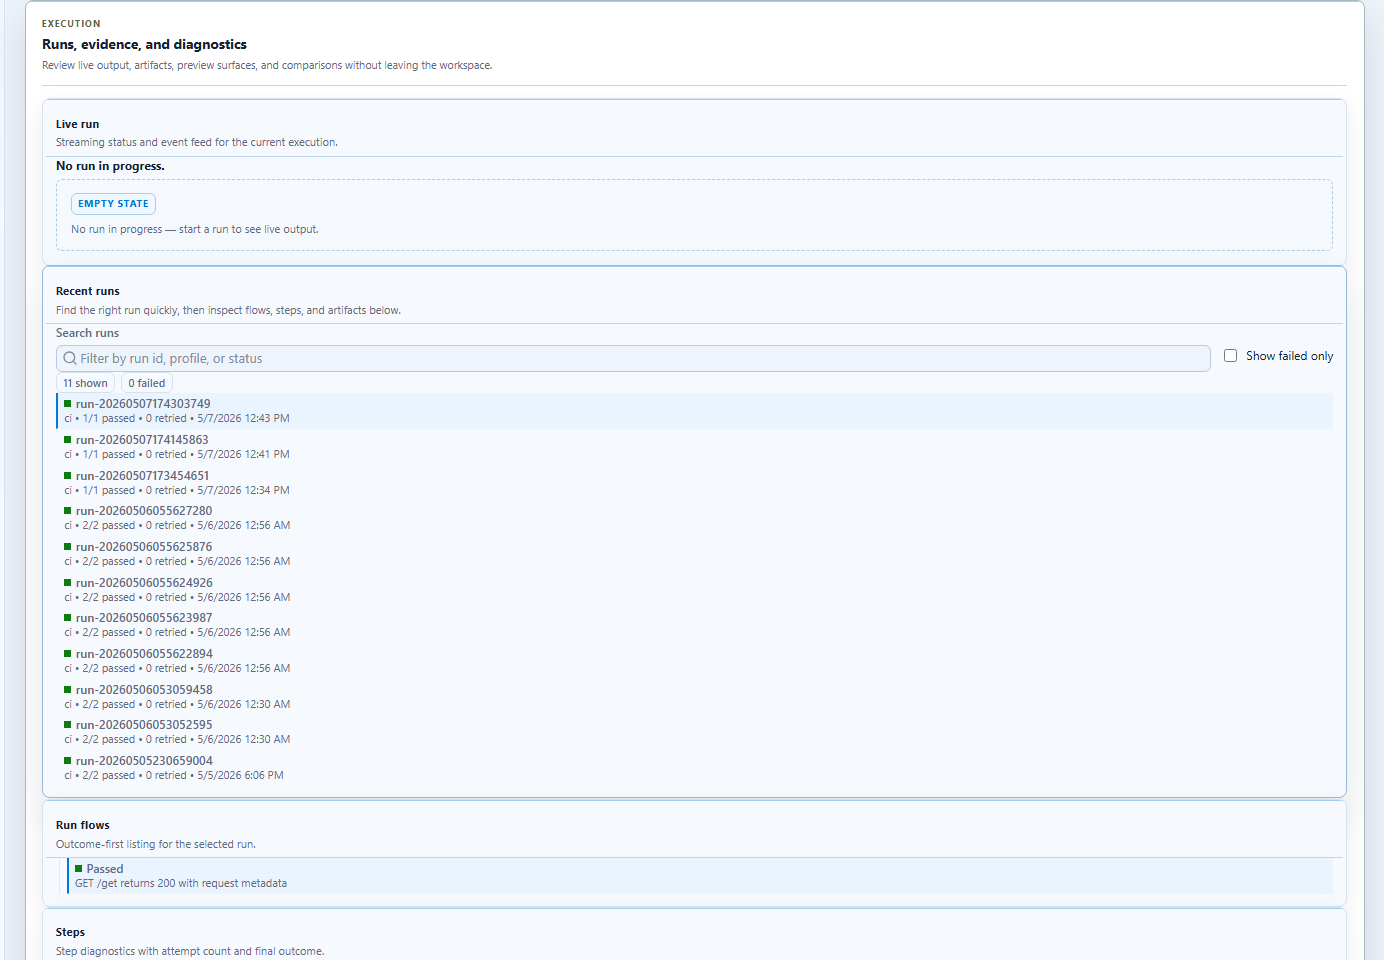
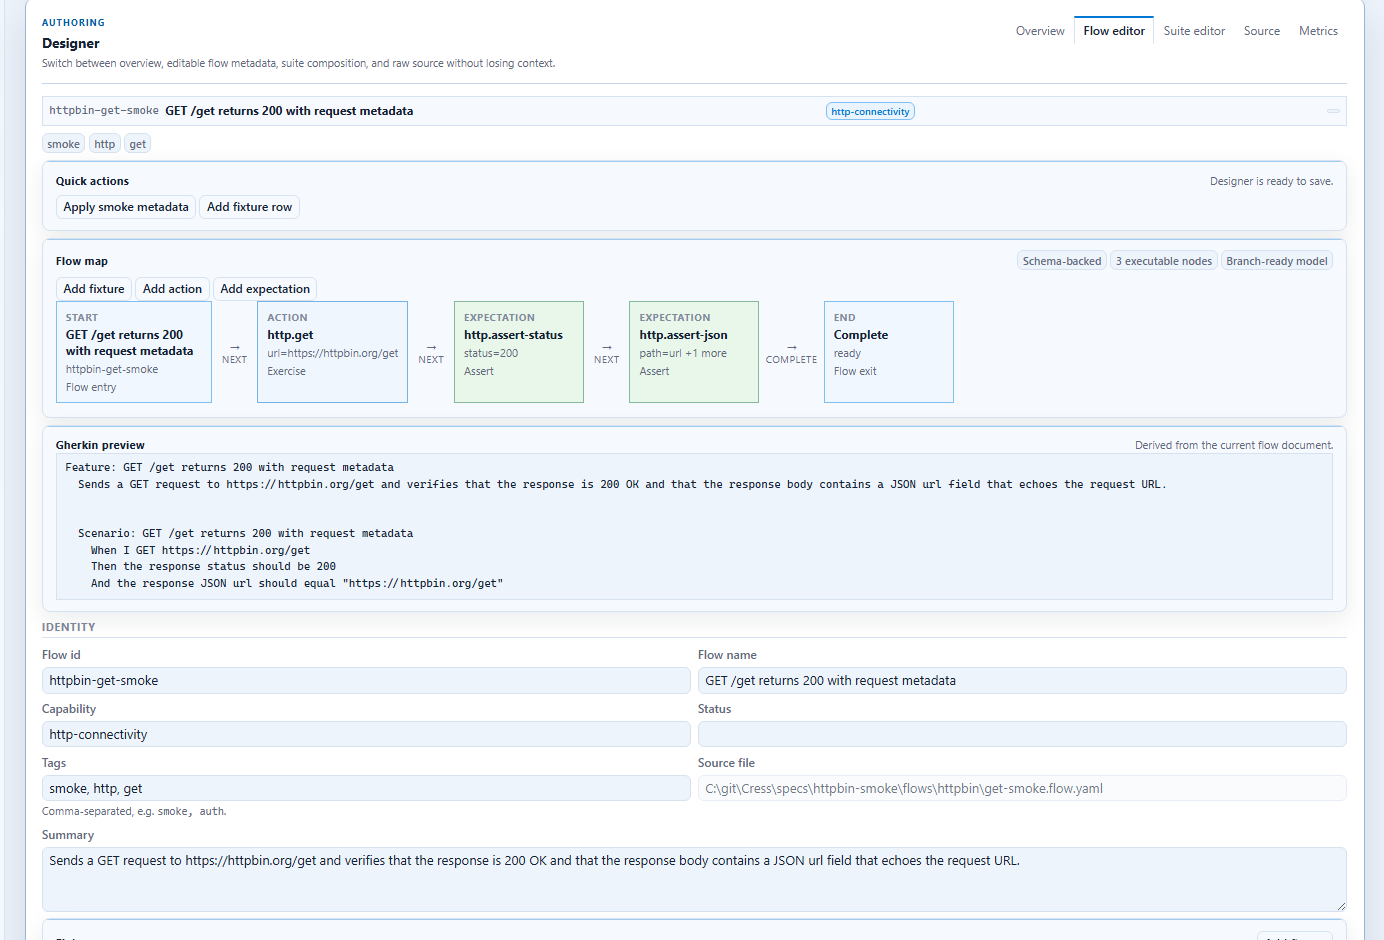
The target picker and source editor screenshots earlier in this guide show the same surfaces used for this walkthrough.
4. Record or refine the flow
The core interaction pattern looks like this:
version: 1
id: calc.add-two-plus-two
name: Calculator returns four for two plus two
tags:
  - desktop
  - smoke
  - calculator

when:
  - step: ui.attach
    with:
      processName: ApplicationFrameHost
  - step: ui.invoke
    with:
      selector: "#num2Button"
  - step: ui.invoke
    with:
      selector: "#plusButton"
  - step: ui.invoke
    with:
      selector: "#num2Button"
  - step: ui.invoke
    with:
      selector: "#equalButton"
then:
  - expect: ui.assert-text
    with:
      selector: "#CalculatorResults"
      text: Display is 4
And the same flow can be narrated naturally in Gherkin:
Given the user launches the `calc.exe` application
When the user clicks the `#clearButton` element
And the user clicks the `#num2Button` element
And the user clicks the `#plusButton` element
And the user clicks the `#num2Button` element
And the user clicks the `#equalButton` element
And the user captures a screenshot named `calc-result`
Then the `#CalculatorResults` element shows `Display is 4`
5. Run the flow with screenshots
dotnet run --project src\Cress.Cli\Cress.Cli.csproj -- run specs\calc-smoke --profile local --report html,json
6. Stabilize it for a real desktop app
Once Calculator works, apply the same approach to your product:
- replace attach details with your executable or window title
- swap demo selectors for your app's stable
#AutomationIdorname:targets - keep the flow small and deterministic
- publish screenshots from CI so failures are easy to triage
Good use cases
Core workflow smoke tests
Start with:
- launch or attach
- one high-value form entry path
- one confirmation or summary assertion
Evidence-heavy verification
Desktop teams often need richer evidence than browser teams because troubleshooting depends on window state and control visibility. Keep screenshot capture enabled while the suite is stabilizing.
Brownfield stabilization
Use early Cress coverage to identify where the app needs:
- stable
AutomationIdvalues - predictable startup paths
- test-friendly dialogs and launch switches
Practical command loop
dotnet run --project src\Cress.Cli\Cress.Cli.csproj -- validate demos\desktop-client
dotnet run --project src\Cress.Cli\Cress.Cli.csproj -- doctor
dotnet run --project src\Cress.Cli\Cress.Cli.csproj -- run demos\desktop-client --profile local --report html,json
Design guidance
- prefer
#AutomationIdover title or text-only matching - keep launch and login flows deterministic
- avoid brittle “click through setup” sequences when a launch argument or test mode is available
- publish screenshots and HTML reports from CI or dedicated Windows agents when possible